Word Columns For A Newsletter – Quick And Easy
Columns are a great way to format your text in a unique way in Microsoft Word and an important part of your document. When creating a Word Document, attention must be paid to making your text accessible and are used every day by people making anything from research papers, to educational leaflets.
This guide will take you through how to create Columns and Column Breaks so you can make your Word Documents stand out. If you want to learn all about how to use Word to it’s full potential, view our Microsoft course offerings here.
How And When To Use Columns
Here I have a Word Document I want to create columns for in order to make it look more like a leaflet. For your own purposes you may want to adjust the number of columns. For this example I will use 3.

Columns can easily be created in any document you are producing from the Page Layout tab, in the Page Setup group. Just select the text you want to format, and click the Columns command.
Columns are particularly useful in conjunction with Words other formatting tools, view our guide on using the Ruler and Paragraph tools here.
The following screenshot shows exactly how to create Columns with certain options highlighted. Just click the Columns Command and use the drop down menu.
1 – This is the Page Layout Tab, this is where all the Column settings are. The Layout Tab has lots of great options for text formatting in general.
2 – Click the Columns Drop Down, to find the options for how many columns you want.
3 – In this example I choose three columns, great for something like a pamphlet. From here you can only have One Column, Two Columns or three.
4 – The “More Columns” option will produce a pop up for additional column settings. You can adjust the number of columns higher here.
If you are having issues finding specific text in your document, read our post on using the Find and Replace tools in word.
With the document we used, I simply selected the body text and chose three Columns for the text. From here you find the spot you want to split the text from, and create your column breaks. To do this, right click and click “Create Column Break”. The document looks like this after.
Now the text is spaced out, and this part of your document is easier to read due to the Column Breaks! You can also save these columns for later use with this comprehensive guide on building blocks.
If you have any reservations on how the text looks, highlight the text you want to format again and go back to the drop down menu and click “More Columns”.
Columns Dialog Box
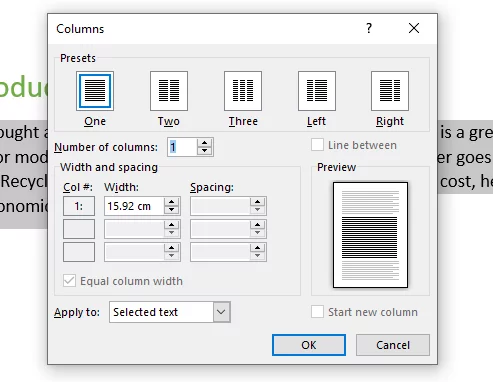
If more than three columns are needed, this is where the Columns window comes in handy. This window will allow you to change your Column format in a variety of ways.
Not only can you have as many columns as you want, the width and spacing measurements can also be altered in this window and a line can be put between the columns.
- Another way to create a column break – Select where to break and then choose a column break from the breaks option on the right of the columns button. The text will continue in the next column. A good place to put a column break is at the end of a paragraph if you are unsure.
Final Thoughts
Columns are a fantastic tool that helps bridge the gap betwen writing on paper and using Word. They are an intuitive way for people to fully realise their design intention, and help people every day to create informative and well organised content.


